https://youtu.be/rskjvc6NcMA
Thursday, December 31, 2015


Monday, November 23, 2015


Friday, October 09, 2015
Google Location Services API - Kapil Sharma
Google Location Services API:
Author(Danny) - http://goo.gl/d55bpz
Package “android.location”
The package “android.location”
has been available since Android was first introduced, and it gives us
access to location services. These services allow applications to obtain
periodic updates of the device’s geographical location.
The package provides two means of acquiring location data:
-
LocationManager.GPS_PROVIDER: Determines location using
satellites. Depending on the conditions, this provider may take a while
to return a location fix.
-
LocationManager.NETWORK_PROVIDER: Determines location based on
availability of nearby cell towers and WiFi access points. This is
faster than GPS_PROVIDER.
When you are looking for user location you have to play with these
providers and their availability. Ideally you obtain the first location
using NETWORK_PROVIDER, which might not be as accurate, but is much
faster. You might then make an attempt to increase accuracy by listening
for a better location fix using the GPS_PROVIDER.
Google Location Services API
Google Location Services API, also known as FusedLocationProviderApi,
is Google’s recommended way of getting a user’s location. It provides
the best accuracy based on our needs. Some of the advantages of using
this API over the previous one are:
-
Simplicity: Unlike the previous API, you no longer have to deal
with multiple providers. Instead, you specify high-level needs, such as
“high accuracy” or “low power”, and it will take a suitable approach.
-
Availability: Gives your app immediate access to the best, most
recent known location. Usually this information is readily available,
you just have to ask for it.
-
Power-efficiency: Minimizes your application’s usage of power.
-
Versatility: Meets a wide range of needs, from foreground uses -
needing highly accurate location data, to background uses - requiring
only periodic location updates with negligible power impact.
Requesting Permission, Configuring AndroidManifest.xml
Androids have specific security features that would prevent any arbitrary application from requesting a precise user location. To solve this, we need to edit “AndroidManifest.xml” and add the permission we require for this application:
<uses-permission android:name="android.permission.ACCESS_FINE_LOCATION" />
<meta-data android:name="com.google.android.gms.version"
           android:value="@integer/google_play_services_version" />
Checking for Google Play Services Availability:
Before accessing features provided by Google Play Services, we must check if the device has Google Play Services installed, and that the version is the one we intend to use (6.5.87).
private boolean checkGooglePlayServices(){
 int checkGooglePlayServices = GooglePlayServicesUtil
  .isGooglePlayServicesAvailable(mContext);
 if (checkGooglePlayServices != ConnectionResult.SUCCESS) {
  /*
  * Google Play Services is missing or update is required
  *  return code could be
  * SUCCESS,
  * SERVICE_MISSING, SERVICE_VERSION_UPDATE_REQUIRED,
  * SERVICE_DISABLED, SERVICE_INVALID.
  */
  GooglePlayServicesUtil.getErrorDialog(checkGooglePlayServices,
  mContext, REQUEST_CODE_RECOVER_PLAY_SERVICES).show();

  return false;
 }

 return true;
}
Accessing Google APIs
To access Google APIs, we just need to perform one more step: create an instance of GoogleApiClient. The Google API Client provides a common entry point to all the Google Play services, and manages the network connection between the user’s device and each Google service.
Github Source: https://github.com/dtrejogo/google-location-services-api
Wednesday, August 19, 2015
Tuesday, August 18, 2015
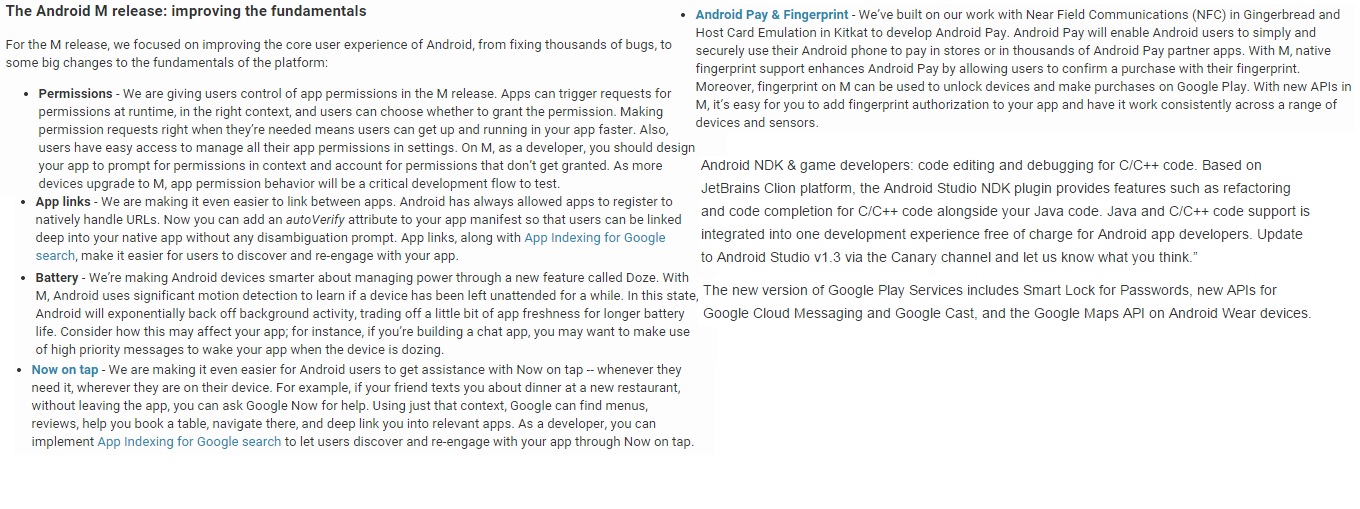
Android Marshmallow - Kapil Sharma

New: API 23
- Android Platform Change:
- Final Permissions User Interface — we updated the permissions user interface and enhanced some of the permissions behavior.
- API Change:
- Updates to the Fingerprint API — which enables better error reporting, better fingerprint enrollment experience, plus enumeration support for greater reliability.
http://android-developers.blogspot.in/2015/08/m-developer-preview-3-final-sdk.html
Developer Preview 3:
Build: MPA44G
Hardware support: Nexus 5, 6, 9, Player
Emulator support: x86 & ARM 32/64-bit
Google Play services: 7.8
Key Changes: Permission changes
Install an Image to a Device:
In order to use a device image for testing, you must install it on a compatible device. Follow the instructions below to install a system image:
- Download and uncompress one of the system image packages listed here.
- Backup any data you want to preserve from the device.
- Follow the instructions at developers.google.com/android to flash the image onto your device.
Set Up the Preview SDK: http://developer.android.com/preview/setup-sdk.html
Android M Preview 3 Developer Docs:
Monday, August 10, 2015
Friday, May 29, 2015


Saturday, April 04, 2015
Android OxygenOS - Kapil Sharma
OxygenOS: Android Lollipop 5.1

Install 'Fastboot and ADB' on your Windows PC.
Step 1: First flash your smartphone with recovery software. Download and save the TWRP file from here.
Step 2: Enable ADB Debugging mode on your smartphone.
Click on Settings -> Developer options and enable ADB Debugging.
Step 3: Switch off the phone. Enter Fastboot mode. You can do this on your OnePlus One by holding down the power button and the volume up button. When you see the fastboot logo, connect your device to your computer.
Step 4: Now on your Windows PC, start Command Prompt. In the CMD terminal, head to the folder where you have saved the TWRP recovery file you downloaded earlier.
Step 5: Type the commands as given below:
fastboot oem unlock
(You can skip this step if your phone’s bootloader is already unlocked).
fastboot flash recovery img
>. Image file should be the TWRP recovery image.
fastboot reboot
Step 6: Now your smartphone should reboot. Keep the smartphone connected to the machine.
Step 7: Head to the folder where you downloaded the OxygenOS file on your PC. You should see the file name oxygenos_1.0.0.zip. Unzip the file and you should be able to see the oxygenos_1.0.0.flashable.zip file being released.
Step 8: Copy oxygenos_1.0.0.flashable.zip to your phone’s internal storage.
Step 9: Once copied, detach the smartphone from the PC. Shut down the phone.
Step 10: Enter the recovery mode on your device. You can do this on your smartphone by holding down both the volume down key and the power button.
Step 11: Once you are in the recovery interface, the first thing you want to do is a factory reset. Again, you will lose all your data so please make sure you have backed up data before doing this.
Step 12: After the wipe, go to install and find oxygenos_1.0.0.flashable.zip. Confirm the flash. This will flash OxygenOS onto your smartphone.
Known Issues:
Files sometimes crash when uploading files to the cloud.When printing images, printer service may stop.
Cannot hang up a call using headphone controls. (intermittent)
During system update, display of Wi-Fi/data notification may be incorrect.
OTG can only recognize FAT32 file system.
During system update, display of version number may be incorrect.
Files does not support multi-select deletes.
Files may crash when renaming image files
Wednesday, November 12, 2014
Android CBT (Class 001) - Kapil Sharma
Android Prerequisite:
1.) Android SDK (Latest)2.) ADT (Android Debugging Tool)
3.) Eclipse IDE or Android Studio
4.) JDK, JRE (Latest)
Links for downloading of the following:
Android SDK: http://developer.android.com/sdk/index.html
ADT: http://developer.android.com/sdk/installing/index.html?pkg=adt
Android studio: https://developer.android.com/sdk/installing/studio.html
Eclipse IDE: https://www.eclipse.org/downloads/
JDK/JRE: http://www.oracle.com/technetwork/java/javase/downloads/jdk7-downloads-1880260.html
Note: In case of any issues, please add your comments, will update it with the right solution ASAP.
Thursday, October 30, 2014
Android ADB Windows Setup - Kapil Sharma
Android ADB Windows Setup:
Prerequisite:
1.) Android-SDK
2.) Windows-7 PC
First download the 'Android-sdk' from this location: https://developer.android.com/sdk/index.html
Extract the zip file on your windows PC drive. Than open the zip file and open the following:
SDK > Platform-tools. (Copy the path where the content is stored)
Now, right click on the 'My Computer' click on 'properties' > again click on 'Advance system setting'.
This will open 'system properties' setting windows. Now click on the 'path' than 'edit' and copy paste the android sdk > platform-tools path in that location.
After adding the location click 'OK' and now open the windows cmd terminal. Now type 'adb devices' and your android adb is start working :)
To learn more regarding Android ADB check this out: https://developer.android.com/tools/help/adb.html
For more information check this image:

Monday, September 15, 2014
Android One - Kapil Sharma
Android One:
A 100$ android smartphone. Where latest android version is 4.4 Kit-kat.
At present threee devices launched in India.
1.) Karbonn Sparkle V
2.) SPICE Dream UNO
3.) Canvasa1

Hardware Specs:
- 4.5” FWVGA display
- Cortex A7 1.3 GHz Quad-Core processor
- 1GB RAM
- 4GB storage (expandable up to 32GB)
- 2x micro SIM
- Front and rear facing cameras (2MP and 5MP)
- Rechargeable lithium-ion, 1700mAh
- Android™ 4.4, KitKat® (and gets the new version soon after it’s released)
Friday, August 01, 2014
Java Github Project URL - Kapil Sharma
Java Github Project URL: https://github.com/bornfreesoul/java
On the above URL. I regularly update code example of different types of java application.
The purpose is to use them in your coding practice or use them as methods in your code if they suits your coding need :)
Fast learning is all ways mutual sharing of your knowledge :)
So keep on sharing and keep on leaning new things ;)
On the above URL. I regularly update code example of different types of java application.
The purpose is to use them in your coding practice or use them as methods in your code if they suits your coding need :)
Fast learning is all ways mutual sharing of your knowledge :)
So keep on sharing and keep on leaning new things ;)
Friday, June 27, 2014
Android L Release: Developer Preview Build Installation - Kapil Sharma
Steps for installation of Android L on Nexus 5 and Nexus 7 series devices:
Step 1: First download the relevant Android L OS file from Google site. (http://developer.android.com/preview/setup-sdk.html)
Step 2: Than open developer options on your Nexus device. These options are hidden.
So go to Settings > About device and then tap on the build number 7 times.
Once you have done that, you will find developer options in your Settings menu.
Step 3: Open developer options and make sure USB Debugging is ticked.
Step 4: Check if your computer has the relevant drivers required for Nexus devices.
If not, download the drivers from here and install.
(http://developer.android.com/sdk/win-usb.html)
Step 5: Make sure you have ADB and Fastboot Installed. For this, follow the steps from here (http://forum.xda-developers.com/showthread.php?t=2317790)
Step 6: Connect your device to computer and open ADB (it will open in a command window). Type adb reboot bootloader. Your phone will go into recovery mode.
Check the screen and see that for Bootloader status it shows unlocked.
Step 7: Most likely your device will have the locked bootloader.
To unlock it, type fastboot oem unlock. Then follow instructions on your phone screen.
This will unlock bootloader as well as do a factory reset of the device.
Step 8: Disconnect and reconnect your device to PC.
You may have to go into settings again, reveal developer options and select USB debugging.
Step 9: Unzip the Android L file you had downloaded. Create a new folder with an easy to type name like Android and put all the files in it. Then put this folder into Minimal ADB and Fastboot Folder which is in your computer's program folder.
Step 10: Hold SHIFT key and right click on the Minimal ADB and Fastboot folder.
From the menu, select "Open Command Window here".
Step 11: With your device connected, type adb reboot bootloader.
Step 12: Navigate (use CD to change directories) to the folder where Android L files are stored.
Step 13: Type flash-all in the command window.
Step 14: If you have done everything right, Android L will be installed on your device.
It will take up to max 15 minutes though.
Warning: This is an developer preview build this may contain bugs and leads to device crashes.
Tuesday, October 01, 2013
Saturday, September 14, 2013
How to create your first Java code on Eclipse: Class 200
How to
create your first Java code on Eclipse: Class 200
Double click on Eclipse short-cut icon, mine Eclipse IDE is Juno flavour.
Click New+ under file menu option then
again click on Java project.(Fig. J1)

Click next after entering Java Project
name.(Fig. J2)

In Java settings page (Fig. J3) just click finished.

After this
the IDE workbench windows (means the windows for writing code opens) now, again
right click on “src” folder select “New” and then select “Class” (Fig. J4).

A New Java “class” file windows opens up, write down the name for that
class and click finished. (Fig. J5).

Now the user named class file open up.
(Fig. J6)

Now write down the code, which shared in the
Fig. J7.

And now, you can see your
output/result in the eclipse-ide console window.
Friday, May 17, 2013
My Android Reboot Class: 101
Class: 101
First class and hands on details, how I try to make my first real application.
What I learn, I will share, each bits and bytes with you all, so that a collective learning can be attained in this first session or in upcoming future sessions.
This lesson is for the first timers, so if you are advance Android experts you can further skip this lesson or future lessons.
So, this how I started my first Android learning curve....................
Prerequisite for this session:
1.) Windows(XP/7/8) Or Ubuntu (10-12.04 LTS) machines.
2.) Eclipse IDE
(http://www.eclipse.org/downloads/packages/eclipse-classic-422/junosr2)
3.) Android SDK (http://developer.android.com/sdk/index.html#download)
4.) ADT-Plugin for Eclipse to integrate Android feature in IDE.
(http://developer.android.com/tools/sdk/eclipse-adt.html)
5.) Latest SDK tools and platforms using Android SDK.
Note:
Don't worry, if you don't know, how to install and configure the above prerequisite. I will share each details with you in upcoming classes :)
Subscribe to:
Posts (Atom)